 Pavel Goishan
在之前的博客中,我们探讨了 GitHub Actions 在 CI 管道中自动触发操作的能力,并介绍了如何在 AWS Spot 实例中使用 GitHub Runner 获得更多灵活性,以及如何在 C++ 项目中使用 GitHub Actions。
这篇文章将进一步介绍如何集成 GitHub Actions 与 Incredibuild(我们已经在社区论坛上讨论过这一话题,但在这里,我们将作进一步探讨)。
我们的讨论涉及两种通过 Incredibuild 触发 GitHub Actions 的可行办法,即通过合并拉取请求或任何其他触发器实现构建分发和加速。
其中的原理十分简单,即将 Incredibuild 的构建分发添加到您的 CI 管道中,以实现构建加速。需要注意的是,尽管我们在下文介绍的是 GitHub Actions 集成的具体内容,但这种方式也同样适用于其他环境(例如Jenkins、GitLab CI、Bitbucket 管道、Travis CI、TeamCity 等),应用的是相同的原理,并采用同样的步骤和配置。如果您正在使用特定的 CI 管道,您可能会发现,Incredibuild 提供的加速能力可以带来更强大的性能并优化您的管道流程。我们十分推荐您进行试用。
先决条件
我们将会了解两种可行架构,相应架构在运行器承载的方式上有所不同,并且我们还会讨论使用两种架构的利弊。针对这两种架构,您需要:
- 一台安装了 Incredibuild Coordinator 的计算机(如果您还没有安装,可以阅读我们的发布帖子:在 AWS 上从零开始设置 Incredibuild 构建系统)
- 与 GitHub 仓库同步的项目
- 设置 GitHub Runner Actions 的相应权限
高级架构

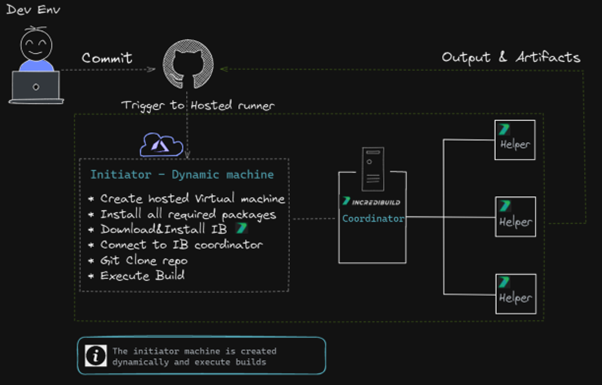
该高级架构十分简单,即从推送事件到项目仓库触发 CI 工作流程。GitHub Actions 将处理事件并触发 Incredibuild Coordinator 服务器上的构建作业,之后该服务器会将构建分发给 Incredibuild 代理(在我们的案例中,代理运行在其他 AWS 节点上)。
我们将以自托管运行器或 GitHub 托管运行器的形式呈现由 GitHub 触发的操作。在我们的案例中,两者的区别在于激活构建的启动器是在 GitHub 环境中(GitHub 托管运行器案例)还是外部计算机(自托管运行器)上运行。
如需了解 GitHub 托管运行器和自托管运行器的区别,请查看该 GitHub 文档页面。
自托管运行器
以下是该高级架构的详细展示:

步骤
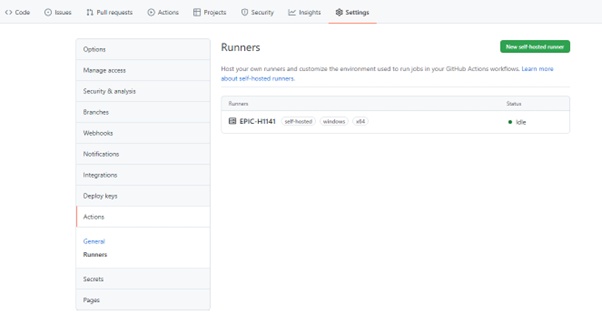
- 设置 GitHub 运行器(参见:在 GitHub 文档中添加自托管运行器):
- 在 GitHub Actions 中,前往设置 > 操作 > 运行器页面,点击新建自托管运行器
- 选择 Windows(我们的案例中)并按照指示操作。
- 在电脑上打开 CMD 并执行以下操作:
mkdir actions-runner

cd actions-runner

Invoke-WebRequest -Uri https://github.com/actions/runner/releases/download/v2.285.1/
actions-runner-win-x64-2.285.1.zip -OutFile actions-runner-win-x64-2.285.1.zip

Add-Type -AssemblyName System.IO.Compression.FileSystem ;
[System.IO.Compression.ZipFile]::ExtractToDirectory("$PWD/actions-runner-win-x64-2.285.1.zip", "$PWD")
-
- 在上一步创建的文件夹中运行 config.cmd 可进行配置:
./config.cmd --url https://github.com/<your-repo-here> --token <your-repo-token-here>
在同一文件夹中,运行 ./run.cmd 文件:

此时,运行器应能执行来自 GitHub Acftions 的命令,您将看到 GitHub Actions 列表已添加该运行器:
8.创建流程:
在 GitHub Actions 中,进入 Actions 选项卡,然后点击新建工作流程。
在列表中选择手动工作流程 > 配置

为流程命名(例如,build_flow.yml)
然后,将流程的内容替换为以下 YAML 内容:
# This flow will launch the instance where the Runner os listening and will execute the run command
name: IB trigger
# Controls when the workflow will run
on:
# Triggers the workflow on push or pull request events but only for the master branch
    push:
        branches: [ master ]
    pull_request:
        branches: [ master ]
jobs:
    # This workflow contains a single job called "build
    build:
    # The type of runner that the job will run on
    runs-on: self-hosted
        # Checks-out your repository under $GITHUB_WORKSPACE, so your job can access it
        - uses: actions/checkout@v2
        # Runs a single command using the runners shell
        - name: Run Rebuild batch file and distribute the tasks within IB helpers
        run: powershell <path_to_your_project_location>\ConsoleAppRebuild.bat
项目位置的路径应与在 config.cmd 行中创建的路径一致
这样就大功告成了。所有内容现在都设置为一旦拉取请求经过确认,便通过 Incredibuild 执行构建。如需跟踪 Incredibuild 仪表板或 Visual Studio 中显示的相同输出的构建进度,请前往 GitHub中的Actions>Allworkflows菜单。
安全和执行策略相关说明
如出现以下与执行策略相关的错误:
File <file_name> cannot be loaded because running scripts is disabled on this system.
需要在 PowerShell 窗口中输入以下内容,将执行策略设置为管理员:
Set-ExecutionPolicy RemoteSigned
可以通过以下方式恢复策略默认值:
Set-ExecutionPolicy Restricted
更多与信息和安全性相关的内容,请参阅 GitHub 自托管运行器安全文档。
下面的视频演示了具体的流程:
GitHub 托管运行器
下面的速写图展示了该高级架构的详细信息:
步骤
在该案例中创建工作流程的步骤与创建自托管工作流程的步骤相同:
- 在 GitHub Actions 中,进入 Actions 选项卡,然后点击新建工作流程。
- 在列表中选择手动工作流程 > 配置

-
- 为工作流程命名(例如,build_flow.yml)
- 之后,将流程内容替换为以下 YAML 内容(这里我们可以看到与自托管示例的不同之处——我们使用 GitHub 来托管运行器):
name: Build on Windows
on: push
jobs:
  build:
    runs-on: windows-2019
    steps:
      -  run: |
          choco install wget -y
          cd C:\
          wget "https://<aws-node>.amazonaws.com/IBSetupConsole.exe" -O "C:\IBSetupConsole.exe"
          ./IBSetupConsole.exe /Install /Components=Agent /Coordinator=<ec2-address> /AddToPath=ON /Agent:InstallAddins=OFF
          New-Item -Path 'HKLM:\SOFTWARE\WOW6432Node\Xoreax\IncrediBuild\Log'
          New-ItemProperty -Path 'HKLM:\SOFTWARE\WOW6432Node\Xoreax\IncrediBuild\Log' -Name 'Level' -Value "4" -PropertyType String -Force

      - name: Add msbuild to PATH
        uses: microsoft/setup-msbuild@v1.1

      - name: Clone Repository and Rebuild with Incredibuild
        run: |
            cd C:\
            git clone <GitHub project>.git
            cd C:\TestBAC-100-
            $env:Path = '<IB Path>\IncrediBuild'
            BuildConsole.exe '<project>.sln' /rebuild /cfg="Debug|x64" /usemsbuild

      - name: Upload artifacts
        if: always()
        uses: actions/upload-artifact@v2
        with:
           name: my-artifact
           path: |
             <IB Path>\IncrediBuild\History
             <IB Path>\IncrediBuild\Logs
当然,您需要用适当的值替换 <IB Path>、<GitHub project> 等。
该 YAML 语言专门用于在 GitHub 托管运行器上运行 Incredibuild。但如果您想进一步理解该 YAML 语言,建议您参阅 GitHub 托管运行器文档。其主要原理就是脚本将在 GitHub 托管的计算机上运行!
您可能已经注意到,自托管和 GitHub 托管的区别在于 runs-on 参数的不同,自托管案例中为“自运行器”,而 GitHub 托管案例中为“windows-2019”。
这一示例如何运作?
- GitHub Action 将通过 windows-2019 创建一个新虚拟机(第 5 行)
- 然后将从 Choco(第 8 行)为我们的项目安装所有相关包
- 从我们预先准备好的 S3 公共存储桶下载 Incredibuild 安装程序(第 10-11 行)
- 运行 IB 静默安装并连接到您的组织协调器(第 11 行)
- 可选:将日志级别提高到“详细”级别(第 12-13 行)
- 将 msbuild 添加到环境变量(第 15-16 行)
- 创建并克隆我们的代码(第 20-21 行)
- 将 BuildConsole.exe 添加到环境变量(第 23 行)
- 运行我们的 Buildconsole 命令(第 24 行)
- 可选:上传所需的工件、日志、构建监控器、可执行文件等(第 26-33 行)
下面的视频清楚演示了具体的流程:
GitHub托管运行器面临的挑战和限制
目前,GitHub 托管运行器和硬件资源十分有限,因此不适用于大型项目。详细的 GitHub 托管选项列表,请参见: GitHub 托管运行器 – 支持的运行器和硬件资源。
每次都需要在新创建的运行器上安装所有需要的包,因此比较耗费时间。
启动器和 Coordinator 的连通性较差,可能导致“任务受阻”,从而增加编译时间。
总结
集成 Incredibuild 系统与 GitHub Actions 并不复杂。您可以通过不同的部署选项来实现集成,所有选项最终都将整合到一个简单的触发器中,通过 Incredibuild 无缝执行构建分发。通过在 CI 管道中添加 IB 构建分发并使用 GitHub Actions 支持的触发器,您将获得流畅的构建分发和加速体验。