 Amir Kirsh
GitHub Actions 是帮助开发者和管理者实现工作流的一种有效方式,如更改存储库中的代码和事件等。这些事件可以是 push 事件(例如编写新的 C++ 代码)、打开或改变拉取请求(以合并更新的 C++ 代码)、创建新的分支、打开或修复问题、cron 计划任务等等。
工作流的步骤使用 YAML 代码定义,并存储在目录 .github/workflows 中。
这些操作在运行程序上执行,运行程序检查可用作业,每次只执行一个作业,直至作业完成。根据设计,运行程序安装在 GitHub 虚拟环境托管的容器中,或者由管理员自行托管。
为什么要在 C++ 项目中使用 GitHub Actions?
GitHub Actions 提供了一个非常方便有效的工具,可让所有与代码相关的工作规范化和自动化,覆盖从编译 C++ 代码,到执行依赖检查、测试等等流程。通过为实施可重复、可迁移的进程,让企业对代码部署将更有自信。此外,GitHub Actions 还可以显著提高开发速度,帮助缩短测试、报告以及提前隔离问题代码的时间,消除手动 CI/CD 活动,如安全分析、启动测试等。
对于那些已经在使用其他 DevOps 工具(如 Jenkins 或 Codeship)的人来说,GitHub Actions可能与这些工具的部分功能有一些重叠。这类团队可以使用下面两种方式的任意一种,发挥 GitHub Actions 的优势:
- 迁移——许多 CI/CD 框架已经实现了类似于 GitHub Actions 的工作流,如 Codeship Steps and Services。此外,已经使用此类框架的团队,可能会发现,与 GitHub 整合的优势很多,因此,将现有流程转化为 GitHub Actions 相当值得。这些优势包括:
- 减少 CI/CD 工具的种类,整合供应商
- 节省费用
- 更好地集成到 GitOps 流程中
- 将测试和验证C++代码步骤左移,提高代码可靠性
- 功能—— GitHub Actions 与其他现有的工作流不一定冲突;一些团队发现,当添加功能时,例如测试新代码库或自动更新依赖项,GitHub Actions 可以更快更好地帮助实现代码。
下面,我们通过一个实例去理解 GitHub Actions 的作用。
GitHub Actions C++——结合使用,效果更佳
在本例中,我们将:
- 创建一个简单的 C++ 程序来打印“Hello,World!”
- 编写代码以支持编译程序,如配置脚本和 Makefile 文件
- 添加测试,以验证代码
- 使用 GitHub Actions 编译和测试所有 C++ 代码,这些代码为发送至主分支的推拉请求代码。
本例中的代码非常简单,但是,如果你不希望通过键入或复制本文中的代码来创建示例,你可以在 GitHub 中找到示例代码。
使用 GitHub Actions
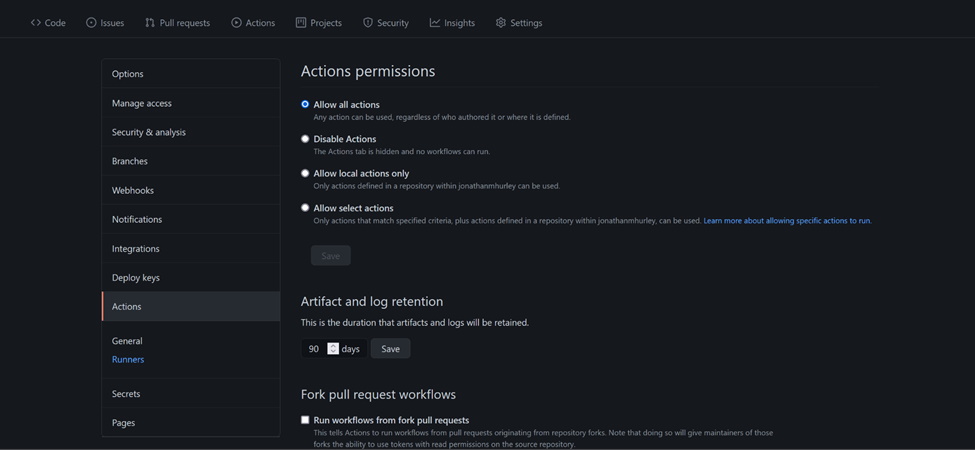
选中 “Allow all actions” (允许所有操作) 选项:、
编写代码
下面这个简单的 Hello World 程序是本示例的基础(Hello.cpp):
#include <iostream>

int main()
{
   std::cout << "Hello, World!" << std::endl;
}
编写一个名为 configure 的配置脚本:
CXX=g++          # The C++ compiler
CXXFLAGS=-g       # C++ complilation flags
NATIVE=on        # compiles code targeted to current hardware
TUNE=generic     # performance-tuning switch
以及一个 Makefile:
/all:
    g++ -std=c++17 hello.cpp -o hello

clean:/
    $(RM) hello
手动测试代码:
$ ./configure && make && ./hello
g++ -std=c++17 hello.cpp -o hello
g++ -std=c++17 helloTest.cpp -lcppunit -o helloTest
Hello, World!
编写一个测试
在代码运行时,编写一个 CppUnit 测试 (helloTest.cpp):
#include <iostream>
#include <cppunit/TestRunner.h>
#include <cppunit/TestResult.h>
#include <cppunit/TestResultCollector.h>
#include <cppunit/extensions/HelperMacros.h>
#include <cppunit/BriefTestProgressListener.h>
#include <cppunit/extensions/TestFactoryRegistry.h>

class Test : public CPPUNIT_NS::TestCase
{
  CPPUNIT_TEST_SUITE(Test);
  CPPUNIT_TEST(testHelloWorld);
  CPPUNIT_TEST_SUITE_END();

public:
 void setUp(void) {}
 void tearDown(void) {}
protected:
 void testHelloWorld(void) {
 system("./hello >nul 2>nul");
 }
};
CPPUNIT_TEST_SUITE_REGISTRATION(Test);

int main()

{
  CPPUNIT_NS::TestResult controller;

  CPPUNIT_NS::TestResultCollector result;
  controller.addListener(&result);

  CPPUNIT_NS::BriefTestProgressListener progress;
  controller.addListener(&progress);

  CPPUNIT_NS::TestRunner runner;
  runner.addTest(CPPUNIT_NS::TestFactoryRegistry::getRegistry().makeTest());
  runner.run(controller);

  return result.wasSuccessful() ? 0 : 1;
}
升级 Makefile 文件,将测试代码和规则添加到原有文件中:
all:
    g++ -std=c++17 hello.cpp -o hello
    g++ -std=c++17 helloTest.cpp -lcppunit -o helloTest

test:
    chmod +x hello
    ./helloTest

clean:
     $(RM) hello helloTest
Again, manually test the code:
$ ./configure && make && make test
g++ -std=c++17 hello.cpp -o hello
g++ -std=c++17 helloTest.cpp -lcppunit -o helloTest
chmod +x hello
./helloTest
Test::testHelloWorld : OK
编写 GitHub Actions
编写代码和测试后,接下来就应该添加 GitHub Actions 了。默认情况下,GitHub Actions 以 YAML 文件的形式存储在 .github/workflows/ 目录中,例如 .github/workflows/helloAction.yml
Name 指令配置一个字符串,该字符串将显示在 GitHub 的 Actions 对话框中。
On 指令管理 GitHub Actions 何时运行,它可以是通用的指令,也可以特定于事件(如 push),并限制在特定的分支(如 main 分支)中。
GitHub Actions 工作流由一个或多个默认并行运行的作业组成。Jobs 定义运行步骤(以下步骤)的位置,以及在该步骤中要执行的操作,例如命令、设置任务,或存储库中的其他操作。Actions 将主要使用命令,如 make 和 configure 命令,但也将从上游导入操作签出。
/name: C/C++ CI

on:
 push:
  branches: [ main ]
 pull_request:
  branches: [ main ]

jobs:
 build-and-test:
   runs-on: ubuntu-latest
   steps:
   - uses: actions/checkout@v2
   - name: install cppunit
   run: sudo apt install -y libcppunit-dev
   - name: configure
   run: ./configure
   - name: make
   run: make
   - name: make test
   run: make test
执行代码
将代码添加至代码存储库中:
$ git add hello.cpp helloTest.cpp Makefile configure .github/workflows/helloAction.yml
$ git commit -m "initial commit" -a
$ git push origin main
检查 GitHub
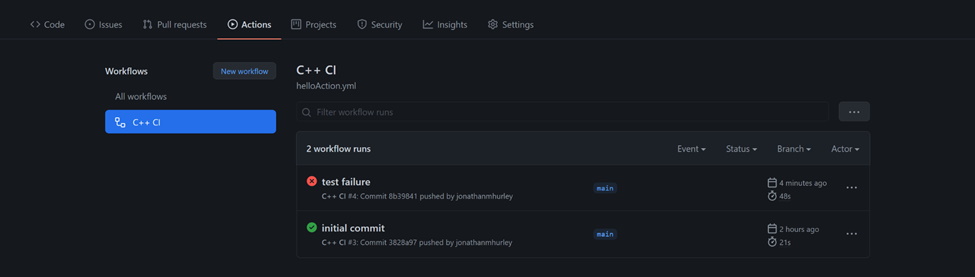
观察 GitHub Actions 的结果:
GitHub Actions 的界面也可以扩展,我们可以看到所有的步骤细节:
故障测试
当然,测试成功是我们的目标,但是在第一次使用一个工具时,用一个失败的案例进行测试总是更加稳妥。因此,我们修改 helloTest.cpp 代码,让测试失败:
#include <iostream>
#include <cppunit/TestRunner.h>
#include <cppunit/TestResult.h>
#include <cppunit/TestResultCollector.h>
#include <cppunit/extensions/HelperMacros.h>
#include <cppunit/BriefTestProgressListener.h>
#include <cppunit/extensions/TestFactoryRegistry.h>

class Test : public CPPUNIT_NS::TestCase
{
CPPUNIT_TEST_SUITE(Test);
CPPUNIT_TEST(testHelloWorld);
CPPUNIT_TEST(failHelloWorld);
CPPUNIT_TEST_SUITE_END();

public:
 void setUp(void) {}
 void tearDown(void) {}

protected:
 void testHelloWorld(void)
{
 system("./hello >nul 2>nul");
}

 void failHelloWorld(void)
{
system("./hello >nul 2>nul");
}


void failHelloWorld(void)
{
exit(1);
}

};

CPPUNIT_TEST_SUITE_REGISTRATION(Test);
int main(int ac, char **av)
{
CPPUNIT_NS::TestResult controller;

CPPUNIT_NS::TestResultCollector result;
controller.addListener(&result);

CPPUNIT_NS::BriefTestProgressListener progress;
controller.addListener(&progress);

CPPUNIT_NS::TestRunner runner;
runner.addTest(CPPUNIT_NS::TestFactoryRegistry::getRegistry().makeTest());
runner.run(controller);

return result.wasSuccessful() ? 0 : 1;
}
手动测试,进一步确认:
$ ./configure && make && make test
g++ -std=c++17 hello.cpp -o hello
g++ -std=c++17 helloTest.cpp -lcppunit -o helloTest
chmod +x hello
./helloTest
Test::testHelloWorld : OK
Test::failHelloWorldMakefile:6: recipe for target 'test' failed
make: *** [test] Error 1
提交,推送更改代码:
/$ git commit -m "test failure" helloTest.cpp && git push origin main
[main 8b39841] test failure
1 file changed, 3 insertions(+), 3 deletions(-)
Counting objects: 3, done.
Delta compression using up to 8 threads.
Compressing objects: 100% (3/3), done.
Writing objects: 100% (3/3), 311 bytes | 155.00 KiB/s, done.
Total 3 (delta 2), reused 0 (delta 0)
remote: Resolving deltas: 100% (2/2), completed with 2 local objects.
To github.com:jonathanmhurley/demo.git
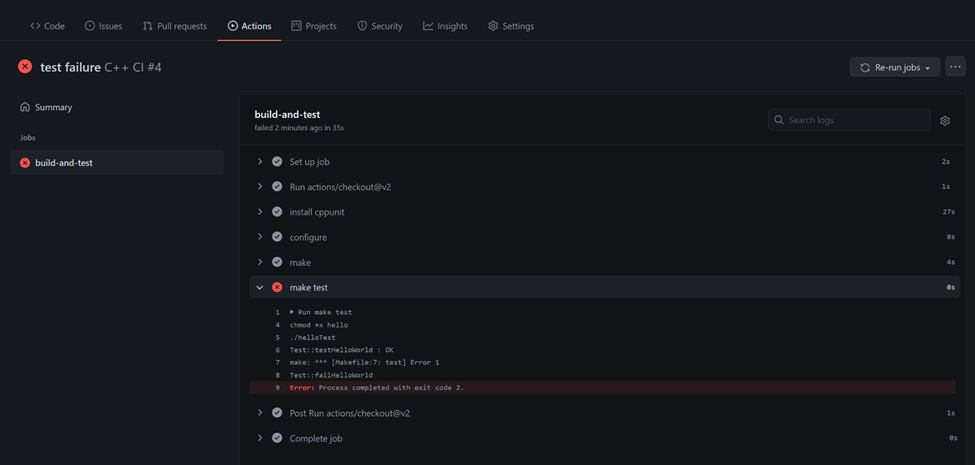
3828a97..8b39841 main -> main/在 GitHub 中观察结果:
当然,我们大概率会得到一个失败的测试,在许多实际操作中,我们也会这样做。改变被测代码单元(即测试代码),让测试失败。因此,我们不用去模拟测试失败,而是直接临时对 hello.cpp 代码进行更改,让它打印其他内容,并查看测试是否能顺利捕获这个缺陷。
GitHub Actions C++ —— 结论
尽管这个示例是在 C++ 和 Make 中使用 GitHub Actions,但实际上,GitHub Actions 也适用于其他语言和项目。其他的相关用例可在 GitHub 指南中找到,例如 python 用例,Java 用例。在 AWS 云中部署代码,使用 GitHub Actions 可参考 GitHub 指南。
GitHub Actions 适用于所有人,但不一定适用于所有进程,部分进程仍需要手动处理,设置为自动触发的成本太高。通常,如果你有希望进行自动触发的进程,在建立并稳定之后,编写一个 Actions 将是最有效的。不过,在急着为所有的触发进程编写GitHub Actions 之前,请确保时间的均衡分配,有效管理这些工作与其他任务,以最高效的方式使用这个功能。但是,当你看到某个操作可以重复进行时,根据你重复进程的具体情况,考虑使用 GitHub Actions 进行自动化。